 JavaWeb - 其它总览
# JavaWeb
# 8、JSP
# 8.1、什么是JSP
Java Server Pages : Java服务器端页面,也和Servlet一样,用于动态Web技术!
最大的特点:
- 写JSP就像在写HTML
- 区别:
- HTML只给用户提供静态的数据
- JSP页面中可以嵌入JAVA代码,为用户提供动态数据;
# 8.2、JSP原理
思路:JSP到底怎么执行的!
代码层面没有任何问题
服务器内部工作
tomcat中有一个work目录;
IDEA中使用Tomcat的会在IDEA的tomcat中生产一个work目录
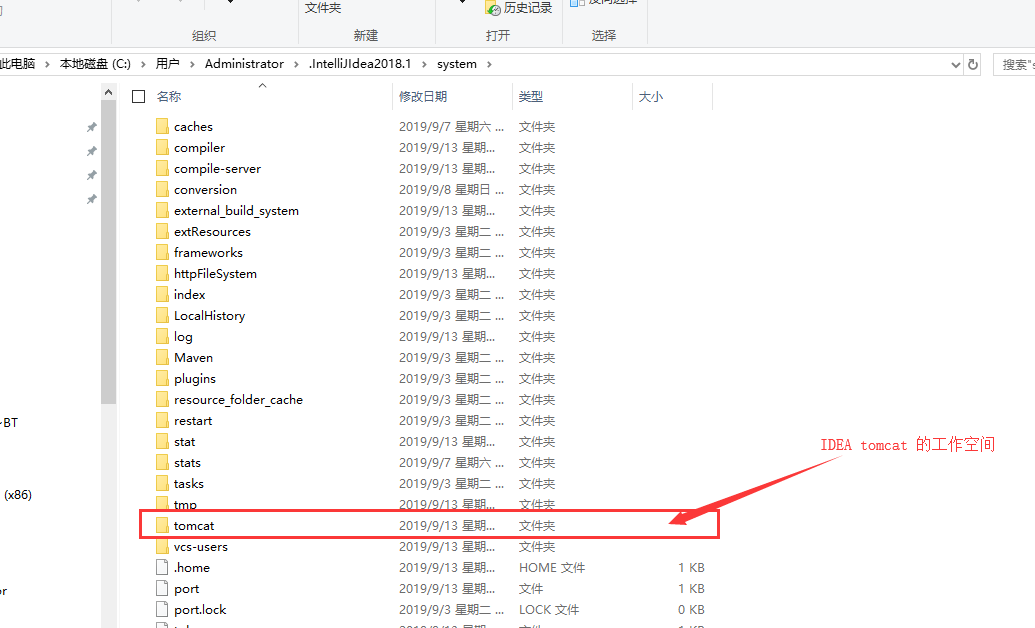
我电脑的地址:
C:\Users\Administrator\.IntelliJIdea2018.1\system\tomcat\Unnamed_javaweb-session-cookie\work\Catalina\localhost\ROOT\org\apache\jsp1发现页面转变成了Java程序!

浏览器向服务器发送请求,不管访问什么资源,其实都是在访问Servlet!
JSP最终也会被转换成为一个Java类!
JSP 本质上就是一个Servlet
//初始化
  public void _jspInit() {

  }
//销毁
  public void _jspDestroy() {
  }
//JSPService
  public void _jspService(.HttpServletRequest request,HttpServletResponse response)
2
3
4
5
6
7
8
9
10
判断请求
内置一些对象
final javax.servlet.jsp.PageContext pageContext;  //页面上下文
javax.servlet.http.HttpSession session = null;    //session
final javax.servlet.ServletContext application;   //applicationContext
final javax.servlet.ServletConfig config;         //config
javax.servlet.jsp.JspWriter out = null;           //out
final java.lang.Object page = this;               //page:当前
HttpServletRequest request                        //请求
HttpServletResponse response                      //响应
1
2
3
4
5
6
7
8输出页面前增加的代码
response.setContentType("text/html");       //设置响应的页面类型
pageContext = _jspxFactory.getPageContext(this, request, response,
                                          null, true, 8192, true);
_jspx_page_context = pageContext;
application = pageContext.getServletContext();
config = pageContext.getServletConfig();
session = pageContext.getSession();
out = pageContext.getOut();
_jspx_out = out;
1
2
3
4
5
6
7
8
9以上的这些个对象我们可以在JSP页面中直接使用!
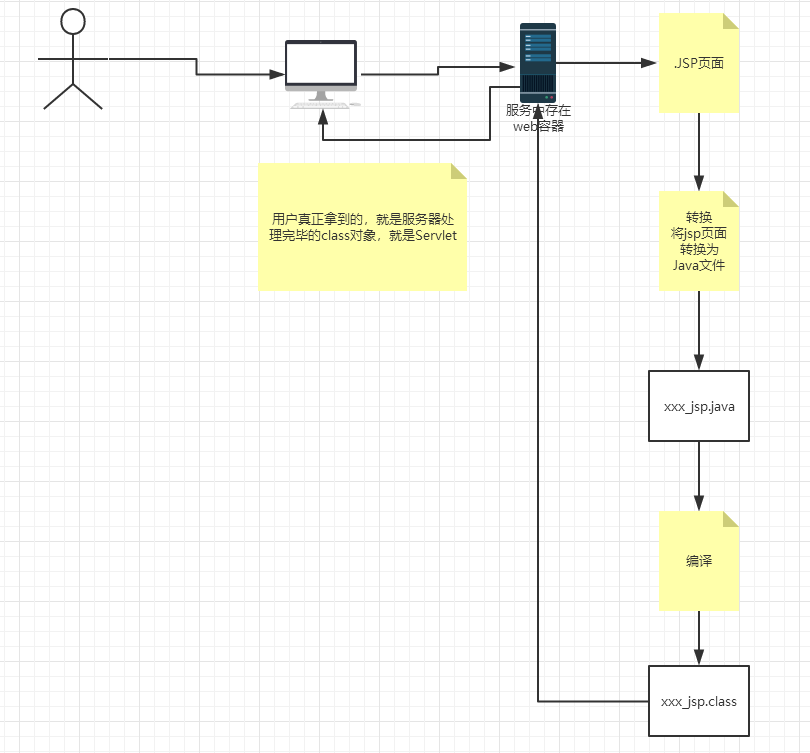
在JSP页面中;
只要是 JAVA代码就会原封不动的输出;
如果是HTML代码,就会被转换为:
out.write("<html>\r\n");
这样的格式,输出到前端!
# 8.3、JSP基础语法
任何语言都有自己的语法,JAVA中有,。 JSP 作为java技术的一种应用,它拥有一些自己扩充的语法(了解,知道即可!),Java所有语法都支持!
# JSP表达式
  <%--JSP表达式
  作用:用来将程序的输出,输出到客户端
  <%= 变量或者表达式%>
  --%>
  <%= new java.util.Date()%>
2
3
4
5
# jsp脚本片段
  <%--jsp脚本片段--%>
  <%
    int sum = 0;
    for (int i = 1; i <=100 ; i++) {
      sum+=i;
    }
    out.println("<h1>Sum="+sum+"</h1>");
  %>
2
3
4
5
6
7
8
9
10
脚本片段的再实现
  <%
    int x = 10;
    out.println(x);
  %>
  <p>这是一个JSP文档</p>
  <%
    int y = 2;
    out.println(y);
  %>

  <hr>


  <%--在代码嵌入HTML元素--%>
  <%
    for (int i = 0; i < 5; i++) {
  %>
    <h1>Hello,World  <%=i%> </h1>
  <%
    }
  %>
2
3
4
5
6
7
8
9
10
11
12
13
14
15
16
17
18
19
20
21
# JSP声明
  <%!
    static {
      System.out.println("Loading Servlet!");
    }

    private int globalVar = 0;

    public void kuang(){
      System.out.println("进入了方法Kuang!");
    }
  %>
2
3
4
5
6
7
8
9
10
11
JSP声明:会被编译到JSP生成Java的类中!其他的,就会被生成到_jspService方法中!
在JSP,嵌入Java代码即可!
<%%>
<%=%>
<%!%>

<%--注释--%>
2
3
4
5
JSP的注释,不会在客户端显示,HTML就会!
# 8.4、JSP指令
<%@page args.... %>
<%@include file=""%>

<%--@include会将两个页面合二为一--%>

<%@include file="common/header.jsp"%>
<h1>网页主体</h1>

<%@include file="common/footer.jsp"%>

<hr>


<%--jSP标签
    jsp:include:拼接页面,本质还是三个
    --%>
<jsp:include page="/common/header.jsp"/>
<h1>网页主体</h1>
<jsp:include page="/common/footer.jsp"/>
2
3
4
5
6
7
8
9
10
11
12
13
14
15
16
17
18
19
20
# 8.5、9大内置对象
- PageContext 存东西
- Request 存东西
- Response
- Session 存东西
- Application 【SerlvetContext】 存东西
- config 【SerlvetConfig】
- out
- page ,不用了解
- exception
pageContext.setAttribute("name1","秦疆1号"); //保存的数据只在一个页面中有效
request.setAttribute("name2","秦疆2号"); //保存的数据只在一次请求中有效,请求转发会携带这个数据
session.setAttribute("name3","秦疆3号"); //保存的数据只在一次会话中有效,从打开浏览器到关闭浏览器
application.setAttribute("name4","秦疆4号");  //保存的数据只在服务器中有效,从打开服务器到关闭服务器
2
3
4
request:客户端向服务器发送请求,产生的数据,用户看完就没用了,比如:新闻,用户看完没用的!
session:客户端向服务器发送请求,产生的数据,用户用完一会还有用,比如:购物车;
application:客户端向服务器发送请求,产生的数据,一个用户用完了,其他用户还可能使用,比如:聊天数据;
# 8.6、JSP标签、JSTL标签、EL表达式
<!-- JSTL表达式的依赖 -->
<dependency>
    <groupId>javax.servlet.jsp.jstl</groupId>
    <artifactId>jstl-api</artifactId>
    <version>1.2</version>
</dependency>
<!-- standard标签库 -->
<dependency>
    <groupId>taglibs</groupId>
    <artifactId>standard</artifactId>
    <version>1.1.2</version>
</dependency>
2
3
4
5
6
7
8
9
10
11
12
13
EL表达式: ${ }
- 获取数据
- 执行运算
- 获取web开发的常用对象
JSP标签
<%--jsp:include--%>

<%--
http://localhost:8080/jsptag.jsp?name=kuangshen&age=12
--%>

<jsp:forward page="/jsptag2.jsp">
    <jsp:param name="name" value="kuangshen"></jsp:param>
    <jsp:param name="age" value="12"></jsp:param>
</jsp:forward>
2
3
4
5
6
7
8
9
10
JSTL表达式
JSTL标签库的使用就是为了弥补HTML标签的不足;它自定义许多标签,可以供我们使用,标签的功能和Java代码一样!
格式化标签
SQL标签
XML 标签
核心标签 (掌握部分)
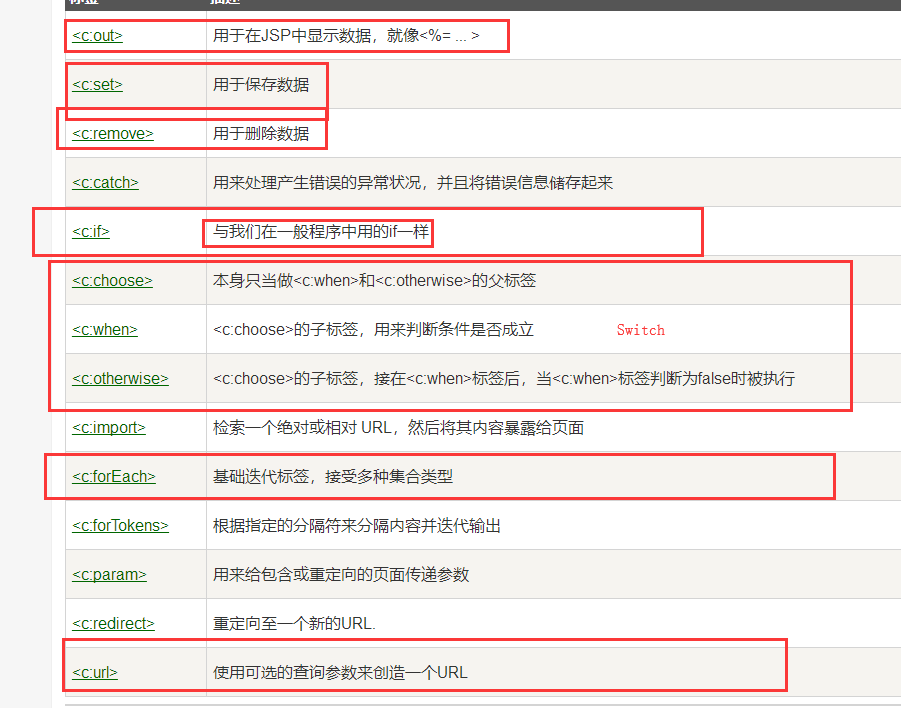
JSTL标签库使用步骤
- 引入对应的 taglib
- 使用其中的方法
- 在Tomcat 也需要引入 jstl的包,否则会报错:JSTL解析错误
c:if
<head>
    <title>Title</title>
</head>
<body>


<h4>if测试</h4>

<hr>

<form action="coreif.jsp" method="get">
    <%--
    EL表达式获取表单中的数据
    ${param.参数名}
    --%>
    <input type="text" name="username" value="${param.username}">
    <input type="submit" value="登录">
</form>

<%--判断如果提交的用户名是管理员,则登录成功--%>
<c:if test="${param.username=='admin'}" var="isAdmin">
    <c:out value="管理员欢迎您!"/>
</c:if>

<%--自闭合标签--%>
<c:out value="${isAdmin}"/>

</body>
2
3
4
5
6
7
8
9
10
11
12
13
14
15
16
17
18
19
20
21
22
23
24
25
26
27
28
c:choose c:when
<body>

<%--定义一个变量score,值为85--%>
<c:set var="score" value="55"/>

<c:choose>
    <c:when test="${score>=90}">
        你的成绩为优秀
    </c:when>
    <c:when test="${score>=80}">
        你的成绩为一般
    </c:when>
    <c:when test="${score>=70}">
        你的成绩为良好
    </c:when>
    <c:when test="${score<=60}">
        你的成绩为不及格
    </c:when>
</c:choose>

</body>
2
3
4
5
6
7
8
9
10
11
12
13
14
15
16
17
18
19
20
21
c:forEach
<%

    ArrayList<String> people = new ArrayList<>();
    people.add(0,"张三");
    people.add(1,"李四");
    people.add(2,"王五");
    people.add(3,"赵六");
    people.add(4,"田六");
    request.setAttribute("list",people);
%>


<%--
var , 每一次遍历出来的变量
items, 要遍历的对象
begin,   哪里开始
end,     到哪里
step,   步长
--%>
<c:forEach var="people" items="${list}">
    <c:out value="${people}"/> <br>
</c:forEach>

<hr>

<c:forEach var="people" items="${list}" begin="1" end="3" step="1" >
    <c:out value="${people}"/> <br>
</c:forEach>
2
3
4
5
6
7
8
9
10
11
12
13
14
15
16
17
18
19
20
21
22
23
24
25
26
27
28
29
# 9、JavaBean
实体类
JavaBean有特定的写法:
- 必须要有一个无参构造
- 属性必须私有化
- 必须有对应的get/set方法;
一般用来和数据库的字段做映射 ORM;
ORM :对象关系映射
- 表--->类
- 字段-->属性
- 行记录---->对象
people表
| id | name | age | address |
|---|---|---|---|
| 1 | 秦疆1号 | 3 | 西安 |
| 2 | 秦疆2号 | 18 | 西安 |
| 3 | 秦疆3号 | 100 | 西安 |
class People{
    private int id;
    private String name;
    private int id;
    private String address;
}

class A{
    new People(1,"秦疆1号",3,"西安");
    new People(2,"秦疆2号",3,"西安");
    new People(3,"秦疆3号",3,"西安");
}
2
3
4
5
6
7
8
9
10
11
12
- 过滤器
- 文件上传
- 邮件发送
- JDBC 复习 : 如何使用JDBC , JDBC crud, jdbc 事务
# 10、MVC三层架构
什么是MVC: Model view Controller 模型、视图、控制器
# 10.1、早些年
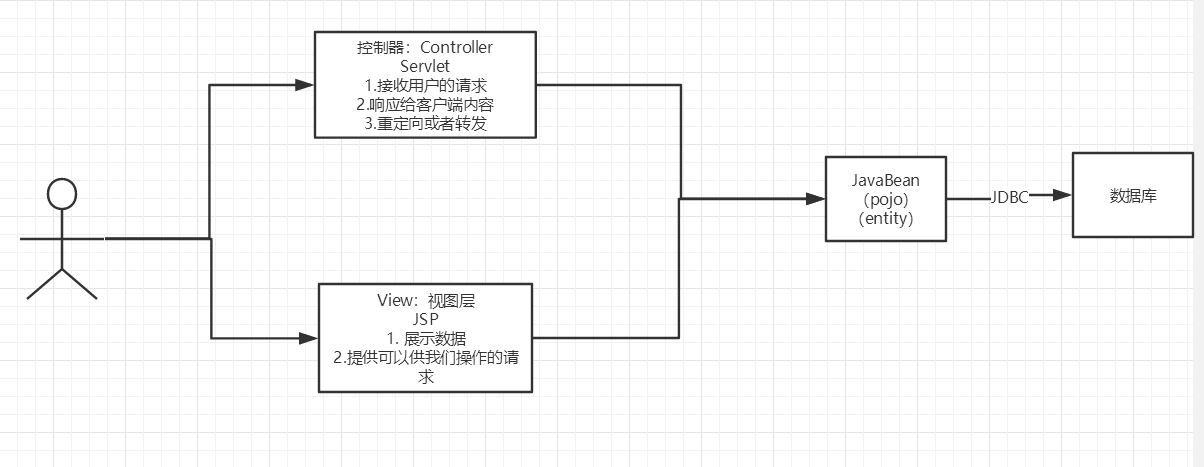
用户直接访问控制层,控制层就可以直接操作数据库;
servlet--CRUD-->数据库
弊端:程序十分臃肿,不利于维护
servlet的代码中:处理请求、响应、视图跳转、处理JDBC、处理业务代码、处理逻辑代码

架构:没有什么是加一层解决不了的!
程序猿调用
|
JDBC
|
Mysql Oracle SqlServer ....
2
3
4
5
6
7
8
9
10
# 10.2、MVC三层架构
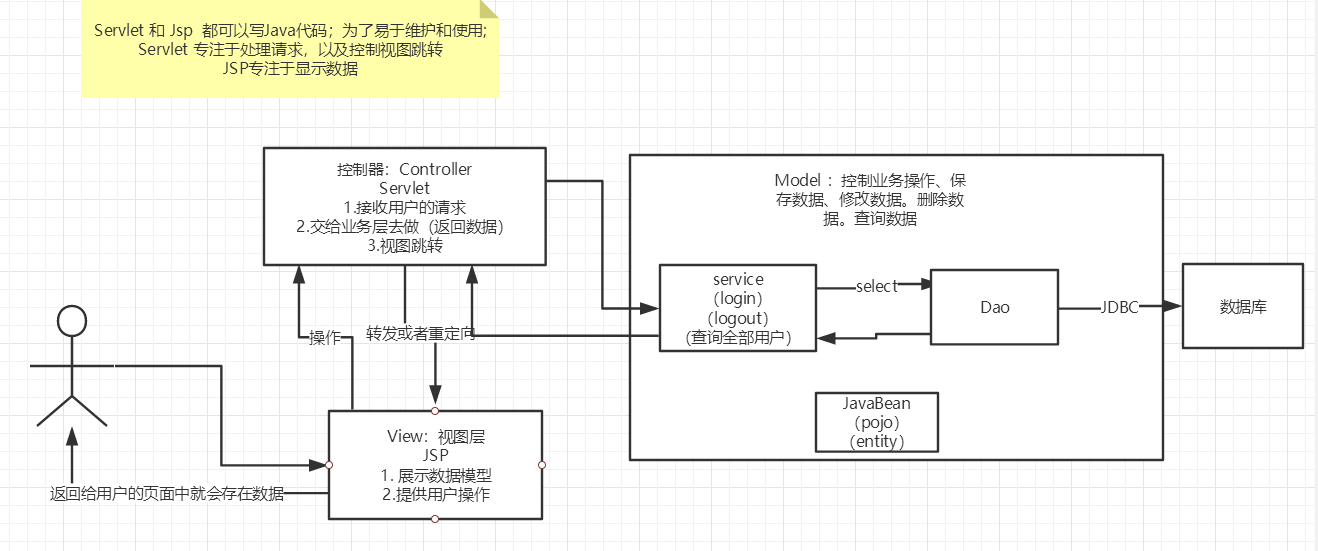
Model
- 业务处理 :业务逻辑(Service)
- 数据持久层:CRUD (Dao)
View
- 展示数据
- 提供链接发起Servlet请求 (a,form,img…)
Controller (Servlet)
接收用户的请求 :(req:请求参数、Session信息….)
交给业务层处理对应的代码
控制视图的跳转
登录--->接收用户的登录请求--->处理用户的请求(获取用户登录的参数,username,password)---->交给业务层处理登录业务(判断用户名密码是否正确:事务)--->Dao层查询用户名和密码是否正确-->数据库1
# 11、Filter (重点)
Filter:过滤器 ,用来过滤网站的数据;
- 处理中文乱码
- 登录验证….
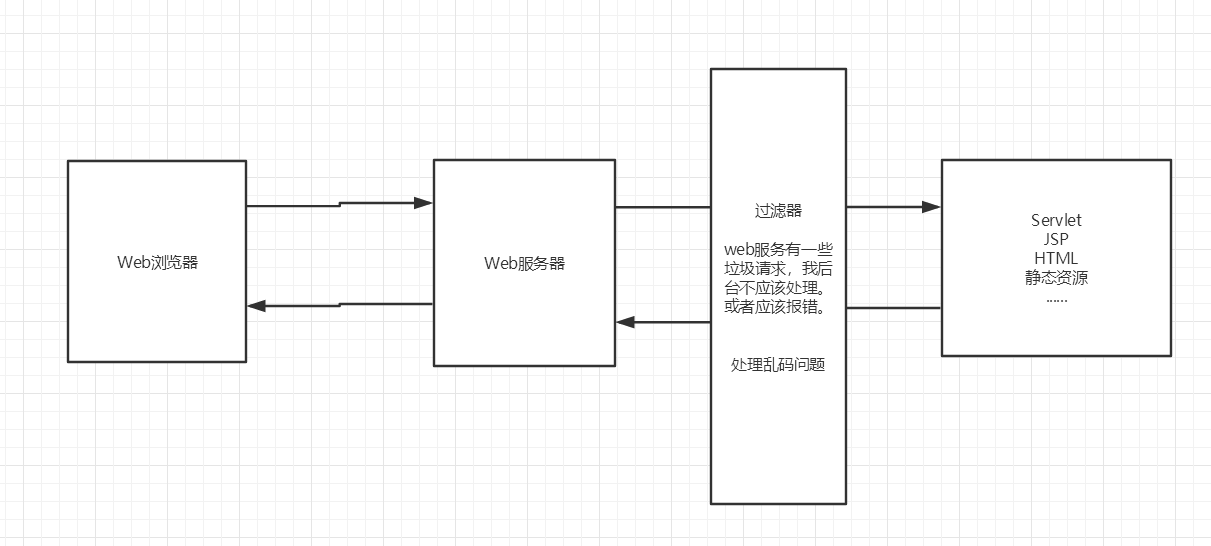
Filter开发步骤:
导包
编写过滤器
导包不要错
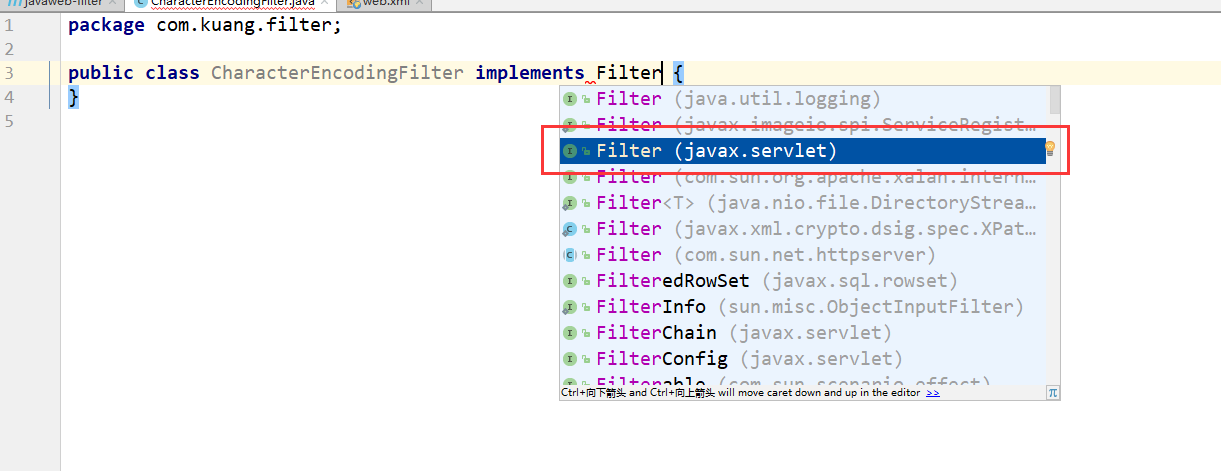
实现Filter接口,重写对应的方法即可
public class CharacterEncodingFilter implements Filter {

    //初始化:web服务器启动,就以及初始化了,随时等待过滤对象出现!
    public void init(FilterConfig filterConfig) throws ServletException {
        System.out.println("CharacterEncodingFilter初始化");
    }

    //Chain : 链
    /*
    1. 过滤中的所有代码,在过滤特定请求的时候都会执行
    2. 必须要让过滤器继续同行
        chain.doFilter(request,response);
     */
    public void doFilter(ServletRequest request, ServletResponse response, FilterChain chain) throws IOException, ServletException {
        request.setCharacterEncoding("utf-8");
        response.setCharacterEncoding("utf-8");
        response.setContentType("text/html;charset=UTF-8");

        System.out.println("CharacterEncodingFilter执行前....");
        chain.doFilter(request,response); //让我们的请求继续走,如果不写,程序到这里就被拦截停止!
        System.out.println("CharacterEncodingFilter执行后....");
    }

    //销毁:web服务器关闭的时候,过滤会销毁
    public void destroy() {
        System.out.println("CharacterEncodingFilter销毁");
    }
}
1
2
3
4
5
6
7
8
9
10
11
12
13
14
15
16
17
18
19
20
21
22
23
24
25
26
27
28
29
在web.xml中配置 Filter
<filter>
    <filter-name>CharacterEncodingFilter</filter-name>
    <filter-class>com.kuang.filter.CharacterEncodingFilter</filter-class>
</filter>
<filter-mapping>
    <filter-name>CharacterEncodingFilter</filter-name>
    <!--只要是 /servlet的任何请求,会经过这个过滤器-->
    <url-pattern>/servlet/*</url-pattern>
    <!--<url-pattern>/*</url-pattern>-->
</filter-mapping>
1
2
3
4
5
6
7
8
9
10
# 12、监听器
实现一个监听器的接口;(有N种)
编写一个监听器
实现监听器的接口…
//统计网站在线人数 : 统计session
public class OnlineCountListener implements HttpSessionListener {

    //创建session监听: 看你的一举一动
    //一旦创建Session就会触发一次这个事件!
    public void sessionCreated(HttpSessionEvent se) {
        ServletContext ctx = se.getSession().getServletContext();

        System.out.println(se.getSession().getId());

        Integer onlineCount = (Integer) ctx.getAttribute("OnlineCount");

        if (onlineCount==null){
            onlineCount = new Integer(1);
        }else {
            int count = onlineCount.intValue();
            onlineCount = new Integer(count+1);
        }

        ctx.setAttribute("OnlineCount",onlineCount);

    }

    //销毁session监听
    //一旦销毁Session就会触发一次这个事件!
    public void sessionDestroyed(HttpSessionEvent se) {
        ServletContext ctx = se.getSession().getServletContext();

        Integer onlineCount = (Integer) ctx.getAttribute("OnlineCount");

        if (onlineCount==null){
            onlineCount = new Integer(0);
        }else {
            int count = onlineCount.intValue();
            onlineCount = new Integer(count-1);
        }

        ctx.setAttribute("OnlineCount",onlineCount);

    }


    /*
    Session销毁:
    1. 手动销毁  getSession().invalidate();
    2. 自动销毁
     */
}
1
2
3
4
5
6
7
8
9
10
11
12
13
14
15
16
17
18
19
20
21
22
23
24
25
26
27
28
29
30
31
32
33
34
35
36
37
38
39
40
41
42
43
44
45
46
47
48
49web.xml中注册监听器
<!--注册监听器-->
<listener>
    <listener-class>com.kuang.listener.OnlineCountListener</listener-class>
</listener>
1
2
3
4看情况是否使用!
# 13、过滤器、监听器常见应用
监听器:GUI编程中经常使用;
public class TestPanel {
    public static void main(String[] args) {
        Frame frame = new Frame("中秋节快乐");  //新建一个窗体
        Panel panel = new Panel(null); //面板
        frame.setLayout(null); //设置窗体的布局

        frame.setBounds(300,300,500,500);
        frame.setBackground(new Color(0,0,255)); //设置背景颜色

        panel.setBounds(50,50,300,300);
        panel.setBackground(new Color(0,255,0)); //设置背景颜色

        frame.add(panel);

        frame.setVisible(true);

        //监听事件,监听关闭事件
        frame.addWindowListener(new WindowAdapter() {
            @Override
            public void windowClosing(WindowEvent e) {
                super.windowClosing(e);
            }
        });


    }
}
2
3
4
5
6
7
8
9
10
11
12
13
14
15
16
17
18
19
20
21
22
23
24
25
26
27
用户登录之后才能进入主页!用户注销后就不能进入主页了!
用户登录之后,向Sesison中放入用户的数据
进入主页的时候要判断用户是否已经登录;要求:在过滤器中实现!
HttpServletRequest request = (HttpServletRequest) req;
HttpServletResponse response = (HttpServletResponse) resp;

if (request.getSession().getAttribute(Constant.USER_SESSION)==null){
    response.sendRedirect("/error.jsp");
}

chain.doFilter(request,response);
1
2
3
4
5
6
7
8
# 14、JDBC
什么是JDBC : Java连接数据库!
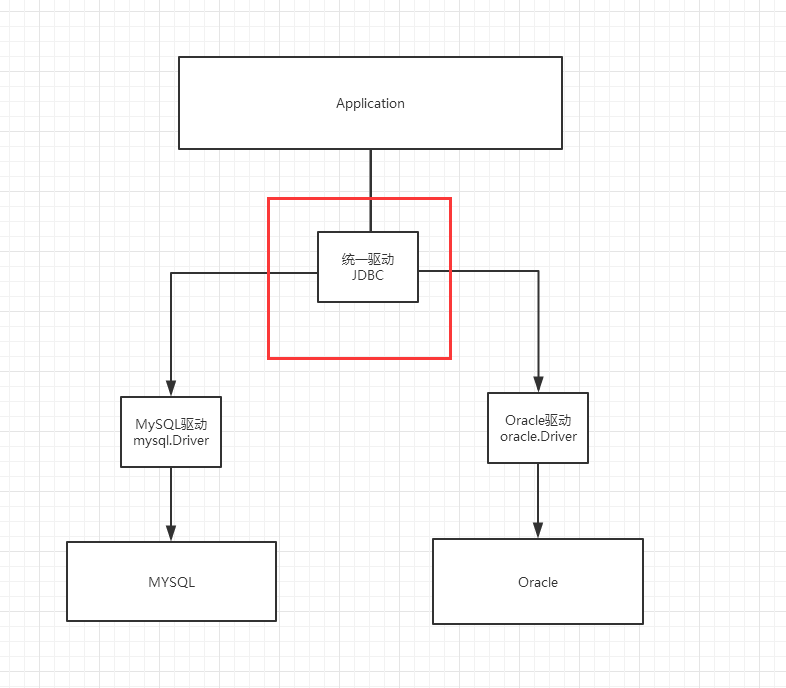
需要jar包的支持:
- java.sql
- javax.sql
- mysql-conneter-java… 连接驱动(必须要导入)
实验环境搭建
CREATE TABLE users(
    id INT PRIMARY KEY,
    `name` VARCHAR(40),
    `password` VARCHAR(40),
    email VARCHAR(60),
    birthday DATE
);

INSERT INTO users(id,`name`,`password`,email,birthday)
VALUES(1,'张三','123456','[email protected]','2000-01-01');
INSERT INTO users(id,`name`,`password`,email,birthday)
VALUES(2,'李四','123456','[email protected]','2000-01-01');
INSERT INTO users(id,`name`,`password`,email,birthday)
VALUES(3,'王五','123456','[email protected]','2000-01-01');


SELECT	* FROM users;
2
3
4
5
6
7
8
9
10
11
12
13
14
15
16
17
18
19
导入数据库依赖
<!--mysql的驱动-->
<dependency>
    <groupId>mysql</groupId>
    <artifactId>mysql-connector-java</artifactId>
    <version>5.1.47</version>
</dependency>
2
3
4
5
6
IDEA中连接数据库:
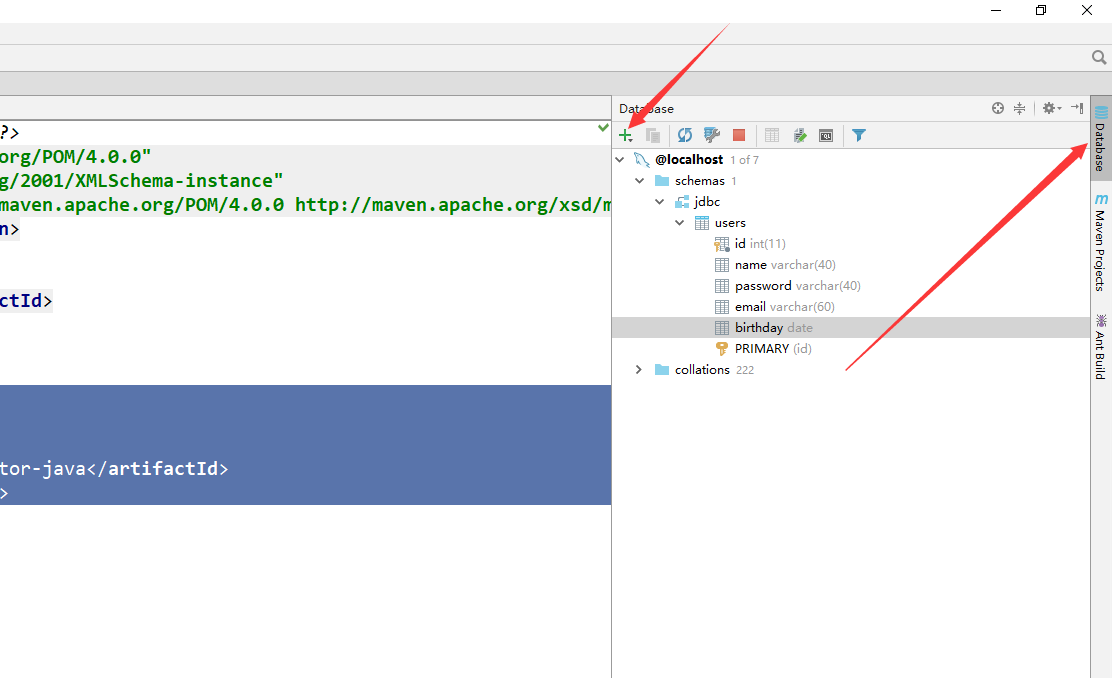
JDBC 固定步骤:
- 加载驱动
- 连接数据库,代表数据库
- 向数据库发送SQL的对象Statement : CRUD
- 编写SQL (根据业务,不同的SQL)
- 执行SQL
- 关闭连接
public class TestJdbc {
    public static void main(String[] args) throws ClassNotFoundException, SQLException {
        //配置信息
        //useUnicode=true&characterEncoding=utf-8 解决中文乱码
        String url="jdbc:mysql://localhost:3306/jdbc?useUnicode=true&characterEncoding=utf-8";
        String username = "root";
        String password = "123456";

        //1.加载驱动
        Class.forName("com.mysql.jdbc.Driver");
        //2.连接数据库,代表数据库
        Connection connection = DriverManager.getConnection(url, username, password);

        //3.向数据库发送SQL的对象Statement,PreparedStatement : CRUD
        Statement statement = connection.createStatement();

        //4.编写SQL
        String sql = "select * from users";

        //5.执行查询SQL,返回一个 ResultSet  : 结果集
        ResultSet rs = statement.executeQuery(sql);

        while (rs.next()){
            System.out.println("id="+rs.getObject("id"));
            System.out.println("name="+rs.getObject("name"));
            System.out.println("password="+rs.getObject("password"));
            System.out.println("email="+rs.getObject("email"));
            System.out.println("birthday="+rs.getObject("birthday"));
        }

        //6.关闭连接,释放资源(一定要做) 先开后关
        rs.close();
        statement.close();
        connection.close();
    }
}
2
3
4
5
6
7
8
9
10
11
12
13
14
15
16
17
18
19
20
21
22
23
24
25
26
27
28
29
30
31
32
33
34
35
36
37
预编译SQL
public class TestJDBC2 {
    public static void main(String[] args) throws Exception {
        //配置信息
        //useUnicode=true&characterEncoding=utf-8 解决中文乱码
        String url="jdbc:mysql://localhost:3306/jdbc?useUnicode=true&characterEncoding=utf-8";
        String username = "root";
        String password = "123456";

        //1.加载驱动
        Class.forName("com.mysql.jdbc.Driver");
        //2.连接数据库,代表数据库
        Connection connection = DriverManager.getConnection(url, username, password);

        //3.编写SQL
        String sql = "insert into  users(id, name, password, email, birthday) values (?,?,?,?,?);";

        //4.预编译
        PreparedStatement preparedStatement = connection.prepareStatement(sql);

        preparedStatement.setInt(1,2);//给第一个占位符? 的值赋值为1;
        preparedStatement.setString(2,"狂神说Java");//给第二个占位符? 的值赋值为狂神说Java;
        preparedStatement.setString(3,"123456");//给第三个占位符? 的值赋值为123456;
        preparedStatement.setString(4,"[email protected]");//给第四个占位符? 的值赋值为1;
        preparedStatement.setDate(5,new Date(new java.util.Date().getTime()));//给第五个占位符? 的值赋值为new Date(new java.util.Date().getTime());

        //5.执行SQL
        int i = preparedStatement.executeUpdate();

        if (i>0){
            System.out.println("插入成功@");
        }

        //6.关闭连接,释放资源(一定要做) 先开后关
        preparedStatement.close();
        connection.close();
    }
}
2
3
4
5
6
7
8
9
10
11
12
13
14
15
16
17
18
19
20
21
22
23
24
25
26
27
28
29
30
31
32
33
34
35
36
37
38
事务
要么都成功,要么都失败!
ACID原则:保证数据的安全。
开启事务
事务提交  commit()
事务回滚  rollback()
关闭事务

转账:
A:1000
B:1000

A(900)   --100-->   B(1100)
2
3
4
5
6
7
8
9
10
Junit单元测试
依赖
<!--单元测试-->
<dependency>
    <groupId>junit</groupId>
    <artifactId>junit</artifactId>
    <version>4.12</version>
</dependency>
2
3
4
5
6
简单使用
@Test注解只有在方法上有效,只要加了这个注解的方法,就可以直接运行!
@Test
public void test(){
    System.out.println("Hello");
}
2
3
4

失败的时候是红色:

搭建一个环境
CREATE TABLE account(
   id INT PRIMARY KEY AUTO_INCREMENT,
   `name` VARCHAR(40),
   money FLOAT
);

INSERT INTO account(`name`,money) VALUES('A',1000);
INSERT INTO account(`name`,money) VALUES('B',1000);
INSERT INTO account(`name`,money) VALUES('C',1000);
2
3
4
5
6
7
8
9
    @Test
    public void test() {
        //配置信息
        //useUnicode=true&characterEncoding=utf-8 解决中文乱码
        String url="jdbc:mysql://localhost:3306/jdbc?useUnicode=true&characterEncoding=utf-8";
        String username = "root";
        String password = "123456";

        Connection connection = null;

        //1.加载驱动
        try {
            Class.forName("com.mysql.jdbc.Driver");
            //2.连接数据库,代表数据库
             connection = DriverManager.getConnection(url, username, password);

            //3.通知数据库开启事务,false 开启
            connection.setAutoCommit(false);

            String sql = "update account set money = money-100 where name = 'A'";
            connection.prepareStatement(sql).executeUpdate();

            //制造错误
            //int i = 1/0;

            String sql2 = "update account set money = money+100 where name = 'B'";
            connection.prepareStatement(sql2).executeUpdate();

            connection.commit();//以上两条SQL都执行成功了,就提交事务!
            System.out.println("success");
        } catch (Exception e) {
            try {
                //如果出现异常,就通知数据库回滚事务
                connection.rollback();
            } catch (SQLException e1) {
                e1.printStackTrace();
            }
            e.printStackTrace();
        }finally {
            try {
                connection.close();
            } catch (SQLException e) {
                e.printStackTrace();
            }
        }
    }
2
3
4
5
6
7
8
9
10
11
12
13
14
15
16
17
18
19
20
21
22
23
24
25
26
27
28
29
30
31
32
33
34
35
36
37
38
39
40
41
42
43
44
45
46
# 15、数据库连接池
概念:其实就是一个容器(集合),存放数据库连接的容器。 当系统初始化好后,容器被创建,容器中会申请一些连接对象,当用户来访问数据库时,从容器中获取连接对象,用户访问完之后,会将连接对象归还给容器。 好处:
- 节约资源
- 用户访问高效
实现:
标准接口:DataSource javax.sql包下的
- 方法:
获取连接:
getConnection()归还连接:Connection.close()。 如果连接对象Connection是从连接池中获取的,那么调用Connection.close()方法,则不会再关闭连接了。而是归还连接
- 一般我们不去实现它,有数据库厂商来实现
- C3P0:数据库连接池技术
- Druid:数据库连接池实现技术,由阿里巴巴提供的
C3P0:数据库连接池技术
- 步骤:
- 导入jar包 (两个) c3p0-0.9.5.2.jar mchange-commons-java-0.2.12.jar ,
不要忘记导入数据库驱动
jar包 - 定义配置文件:
名称:
c3p0.properties或者c3p0-config.xml路径:直接将文件放在src目录下即可。
- 创建核心对象 数据库连接池对象
ComboPooledDataSource() - 获取连接:
getConnection()
- 代码:
//1.创建数据库连接池对象
DataSource ds  = new ComboPooledDataSource();
//2. 获取连接对象
Connection conn = ds.getConnection();
2
3
4
Druid:数据库连接池实现技术,由阿里巴巴提供的
- 步骤:
- 导入jar包
druid-1.0.9.jar - 定义配置文件:
- 是
properties形式的* - 可以叫任意名称,可以放在任意目录下*
- 是
- 加载配置文件。
Properties - 获取数据库连接池对象:通过工厂来来获取
DruidDataSourceFactory() - 获取连接:
getConnection()
- 代码:
//3.加载配置文件
Properties pro = new Properties();
InputStream is = DruidDemo.class.getClassLoader().getResourceAsStream("druid.properties");
pro.load(is);
//4.获取连接池对象
DataSource ds = DruidDataSourceFactory.createDataSource(pro);
//5.获取连接
Connection conn = ds.getConnection();
2
3
4
5
6
7
8
定义工具类
- 定义一个类 JDBCUtils
- 提供静态代码块加载配置文件,初始化连接池对象
- 提供方法
- 获取连接方法:通过数据库连接池获取连接
- 释放资源
- 获取连接池的方法
代码:
public class JDBCUtils {

    //1.定义成员变量 DataSource
    private static DataSource ds ;

    static{
        try {
            //1.加载配置文件
            Properties pro = new Properties();
            pro.load(JDBCUtils.class.getClassLoader().getResourceAsStream("druid.properties"));
            //2.获取DataSource
            ds = DruidDataSourceFactory.createDataSource(pro);
        } catch (IOException e) {
            e.printStackTrace();
        } catch (Exception e) {
            e.printStackTrace();
        }
    }

    /**
     * 获取连接
     */
    public static Connection getConnection() throws SQLException {
        return ds.getConnection();
    }

    /**
     * 释放资源
     */
    public static void close(Statement stmt,Connection conn){
			       /* if(stmt != null){
			            try {
			                stmt.close();
			            } catch (SQLException e) {
			                e.printStackTrace();
			            }
			        }

			        if(conn != null){
			            try {
			                conn.close();//归还连接
			            } catch (SQLException e) {
			                e.printStackTrace();
			            }
			        }*/

        close(null,stmt,conn);
    }


    public static void close(ResultSet rs , Statement stmt, Connection conn){

        if(rs != null){
            try {
                rs.close();
            } catch (SQLException e) {
                e.printStackTrace();
            }
        }
        if(stmt != null){
            try {
                stmt.close();
            } catch (SQLException e) {
                e.printStackTrace();
            }
        }

        if(conn != null){
            try {
                conn.close();//归还连接
            } catch (SQLException e) {
                e.printStackTrace();
            }
        }
    }

    /**
     * 获取连接池方法
     */

    public static DataSource getDataSource(){
        return  ds;
    }
}
2
3
4
5
6
7
8
9
10
11
12
13
14
15
16
17
18
19
20
21
22
23
24
25
26
27
28
29
30
31
32
33
34
35
36
37
38
39
40
41
42
43
44
45
46
47
48
49
50
51
52
53
54
55
56
57
58
59
60
61
62
63
64
65
66
67
68
69
70
71
72
73
74
75
76
77
78
79
80
81
82
83
84
